Setting Up Email Integrations

Written by Jenna Tighe
Updated at July 12th, 2023
- Agent Elite University
- My Account
- Agent Elite Max (CRM)
- Design Studio
- Local Presence
-
Website
Real Estate Specific (Click here for a full list of articles) Email Marketing Automation and Integration (Click here for a full list of articles) Integrations Landing Pages Single Property Websites & Flyers Blogs Mortgage Specific (Click here for a full list of articles) Analytics IDX Search Engine Optimization (SEO) Team Marketing Automation
- Facebook Ads
Setting Up the Integration for Gmail
- Navigate to Setup > Account > Integrations.
- Click the “ADD NEW” button.
-
Click the “Emails & Calendar Sync” dropdown and the “ADD EMAIL & CALENDAR SYNC” button.
-
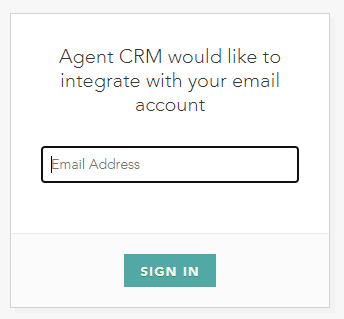
You will be redirected to a page asking you to provide the email address you want to integrate. Enter your email and click the “SIGN IN” button.
-
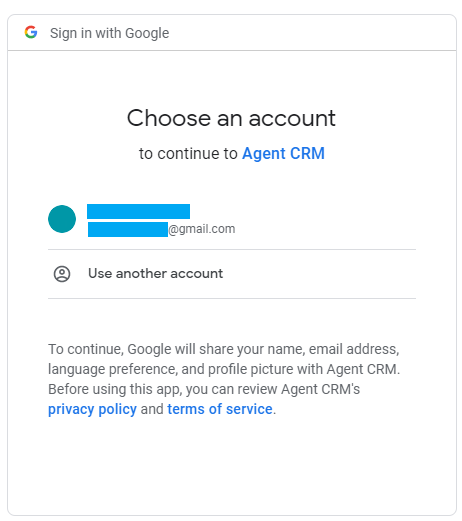
You are then redirected to a Google Sign-in screen. Either choose a Gmail account to integrate with, or enter your Gmail credentials if not logged in.
-
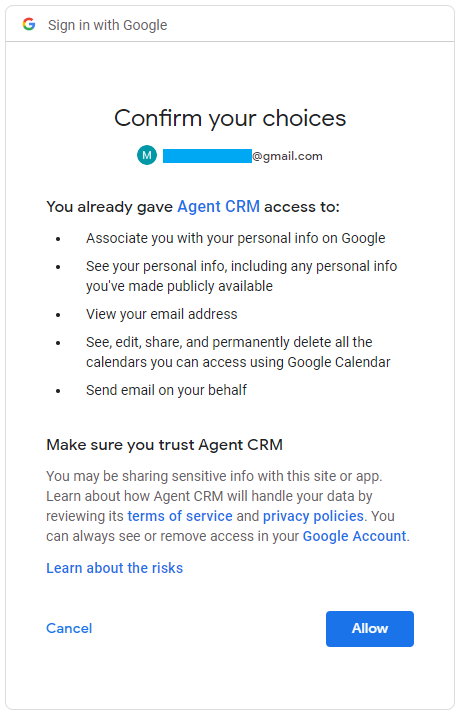
The next screen will ask you to confirm permissions to grant Agent CRM access for the integration. Click the “ALLOW” button.
-
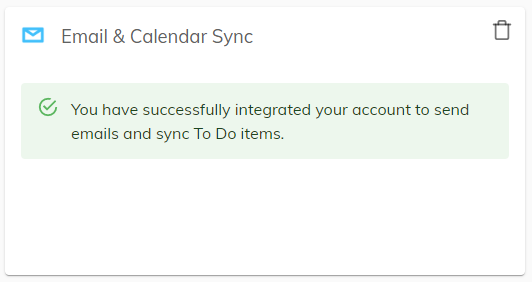
You are then returned to the Integrations page in your Control Panel. If you only want to send emails and don’t need to sync your Calendar account, your integration is complete!

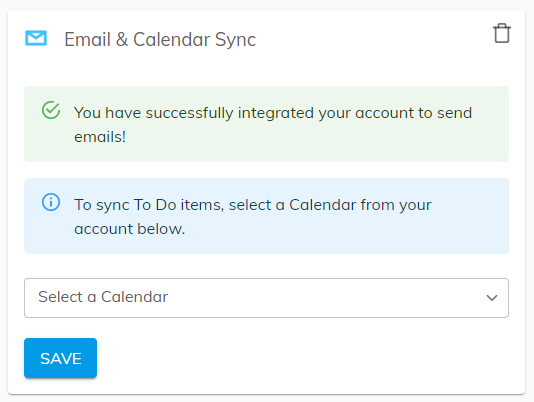
To integrate Calendar with Control Panel.
- If you do want to sync your To Do list items with your Calendar, use the “Select a Calendar” dropdown to choose a calendar to sync. Then click the “SAVE” button.
-
Your Calendar integration is now complete.

Setting Up the Integration for Outlook
- Navigate to Setup > Account > Integrations.
- Click the “ADD NEW” button.
-
Click the “Emails & Calendar Sync” dropdown and the “ADD EMAIL & CALENDAR SYNC” button.
-
You will be redirected to a page asking you to provide the email address you want to integrate. Enter your email and click the “SIGN IN” button.
-
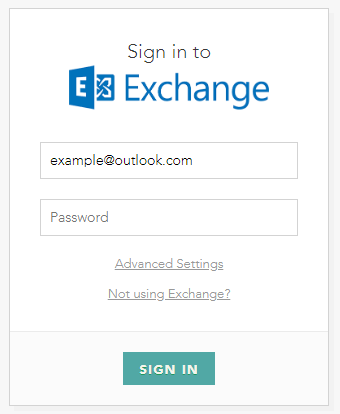
You are then directed to a form to enter your Outlook email and password. Enter your password and select the “SIGN IN” button.
- If you have activated two-factor authentication for your Outlook account, you will need to generate an app password in this form instead. Read Microsoft’s article on how to generate an app password for your Outlook account here.
-
You are then returned to the Integrations page in your Control Panel. If you only want to send emails and don’t need to sync your Calendar account, your integration is complete!


To integrate Calendar with Control Panel.
- If you do want to sync your To Do list items with your Calendar, use the “Select a Calendar” dropdown to choose a calendar to sync. Then click the “SAVE” button.
-
Your calendar integration is now complete.
Setting Up the Integration for Yahoo
- Navigate to Setup > Account > Integrations.
- Click the “ADD NEW” button.
-
Click the “Emails & Calendar Sync” dropdown and the “ADD EMAIL & CALENDAR SYNC” button.
-
You will be redirected to a page asking you to provide the email address you want to integrate. Enter your email and click the “SIGN IN” button.
-
You are then directed to a sign-in form for Yahoo. You will need to use a “generated app password” for this form rather than your usual Yahoo password. To generate this password, read Yahoo’s article on how to generate an app password can be found here.
- Once you have obtained your generated app password and entered it into the form, click the “SIGN IN” button.
-
You are then returned to the Integrations page in your Control Panel. If you only want to send emails and don’t need to sync your Calendar account, your integration is complete!


To integrate Calendar with Control Panel.
- If you do want to sync your To Do list items with your Calendar, use the “Select a Calendar” dropdown to choose a calendar to sync. Then click the “SAVE” button.
-
Your calendar integration is now complete.

Setting Up the Integration for iCloud
NOTE: iCloud accounts do not support calendar integration.
- Navigate to Setup > Account > Integrations.
- Click the “ADD NEW” button.
-
Click the “Emails & Calendar Sync” dropdown and the “ADD EMAIL & CALENDAR SYNC” button.
-
You will be redirected to a page asking you to provide the email address you want to integrate. Enter your iCloud email and click the “SIGN IN” button.
-
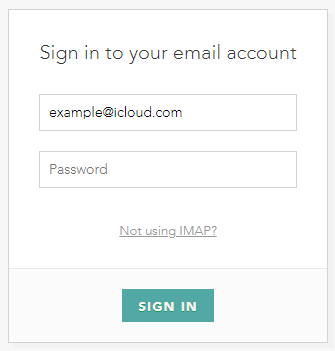
You are then directed to a sign-in form for iCloud. You will need to use an “app-specific password” for this form rather than your usual iCloud password. To generate this password, read Apple’s article on how to generate an app-specific password can be found here.
- Once you have obtained your app-specific password and entered it into the form, click the “SIGN IN” button.
-
You are then returned to the Integrations page in your Control Panel. Your email integration is complete!


Setting Up the Integration for Other Email Providers
Setting Up the Integration for Other Email Providers
- Navigate to Setup > Account > Integrations.
- Click the “ADD NEW” button.
-
Click the “Emails & Calendar Sync” dropdown and the “ADD EMAIL & CALENDAR SYNC” button.
-
You will be redirected to a page asking you to provide the email address you want to integrate. Enter your email and click the “SIGN IN” button.
-
You are then directed to select which email provider you use – select the Other icon.
-
Enter your account password and input IMAP and SMTP settings in the provided form. You can typically find IMAP and SMTP server connection information in your email provider’s help articles or settings.
- Email: the email address you are integrating with
- Password: the password for the email account
- IMAP Host:
- Port (for IMAP): defaults to 993
- SMTP Host:
- Port (for SMTP): defaults to 587
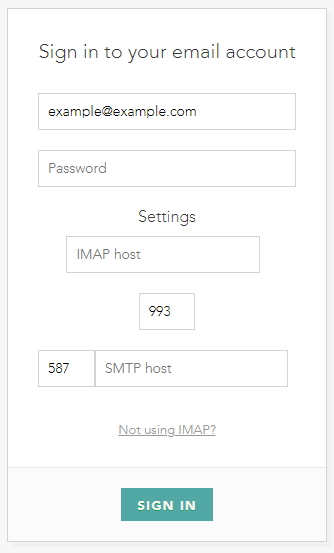
- After you fill in all the form fields, click the “SIGN IN” button.
-
You are then returned to the Integrations page in your Control Panel. If you only want to send emails and don’t need to sync your Calendar account, your integration is complete.


To integrate Calendar with Control Panel.
- If you do want to sync your To Do list items with your Calendar, use the “Select a Calendar” dropdown to choose a calendar to sync. Then click the “SAVE” button.
-
Your calendar integration is now complete.
