How To Send Custom Emails to Your Leads

Written by Jenna Tighe
Updated at December 7th, 2022
- Agent Elite University
- My Account
- Agent Elite Max (CRM)
- Design Studio
- Local Presence
-
Website
Real Estate Specific (Click here for a full list of articles) Email Marketing Automation and Integration (Click here for a full list of articles) Integrations Landing Pages Single Property Websites & Flyers Blogs Mortgage Specific (Click here for a full list of articles) Analytics IDX Search Engine Optimization (SEO) Team Marketing Automation
- Facebook Ads
Table of Contents
Once you have integrated your email account into the Control Panel, Agent CRM accounts can start sending emails to leads or any email address.
The Send Email feature is meant to send-one off emails to small groups of leads or single contacts. This feature is separate from Automated Marketing Campaigns, where a series of emails are pre-set, and leads are added to the campaign.
NOTE #1: Users are limited to emailing a maximum of 500 recipients every 24 hours to ensure that their emails don't spam.
NOTE #2: The emails won't be sent instantaneously to all leads on your send list to prevent your email from going to your contact's spam folder. To improve deliverability, expect the email to send to a lead every 2 minutes. For example, if you select 15 leads to send an email, it should take about 30 minutes to finish sending to all 15 leads.
Below you will find instructions on Sending a New Email, Saving and Editing Draft Emails, and Viewing Sent Emails.
Sending a New Email
- Navigate to Communications > Send Email > New Email.
-
To send an email, you must fill in the "Subject Line" field and add at least one contact to the "Select Leads" field.
- You can enter an existing lead's name or email OR a brand-new email address not associated with a current lead to the Send List.

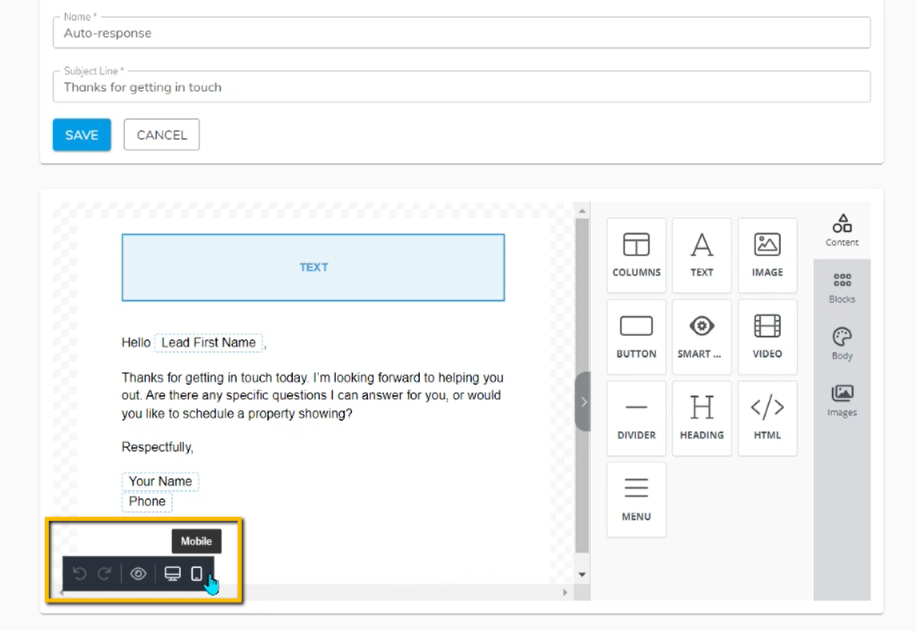
3. To edit/create the content of the email, use the editor window on the bottom half of the screen. You can drag elements from the right-hand drawer into the edit zone on the left.
4. To send the email, ensure all required fields are filled in and click the "SEND NOW" button.
5. To save a draft, ensure the "Select Leads" field is empty and click the "SAVE AS DRAFT" button.
NOTE #3: You cannot save an email as a draft if you have started to enter any leads or email addresses into the send-to field. You can clear the send-to field to save the email as a draft.
NOTE #4: You preview any draft email in desktop or mobile phone view.
Saving and Editing Draft Emails
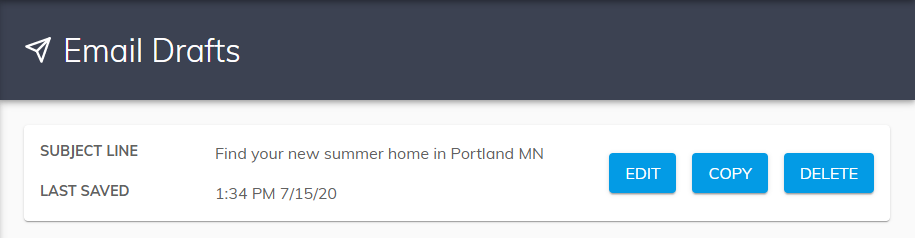
- Navigate to Communications > Send Email > Email Drafts.
- You will see a list of all draft emails, with the subject line of the draft and the date and time the draft was last saved. Actions you can take on the draft email appear as buttons on the right.
- You can continue editing a Draft by clicking the "EDIT" button.
- You can delete an email draft by clicking the "DELETE" button.
- You can make a copy of a draft and start editing the copy by clicking the "COPY" button.
Viewing Sent Emails
- Navigate to Communications > Send Email > Sent Emails.
- SUBJECT LINE: the subject line of the sent email
- DATE SENT: the date and time you sent the email – not necessarily the exact time recipients received the email
- LEADS SENT TO: the total number of leads to whom you sent the email
- % OPENS: the percent of recipients that opened the email
- %CLICK-THRUS: the percent of recipients that clicked on the email

2. View the content of a sent email and a list of the leads the email was sent to by clicking the "VIEW" button.

3. When viewing a Sent Email, you can view all leads and email addresses that the email was sent to by clicking on the dropdown labeled "Leads Sent to #."
4. Like Draft Emails, you can copy the content of a Sent Email by clicking the "COPY" button.