MAX for Real Estate App - How To Use The To Do List
Discover how to effectively utilize the to-do list feature in the MAX App for improved task management and productivity.
- Agent Elite University
- My Account
- Agent Elite Max (CRM)
- Design Studio
- Local Presence
-
Website
Real Estate Specific (Click here for a full list of articles) Email Marketing Automation and Integration (Click here for a full list of articles) Integrations Landing Pages Single Property Websites & Flyers Blogs Mortgage Specific (Click here for a full list of articles) Analytics IDX Search Engine Optimization (SEO) Team Marketing Automation
- Facebook Ads
Table of Contents
Users of the Agent CRM can create tasks to help manage their workload and to associate tasks to specific leads. This feature is only available for the Agent CRM product.
Basics of To Do
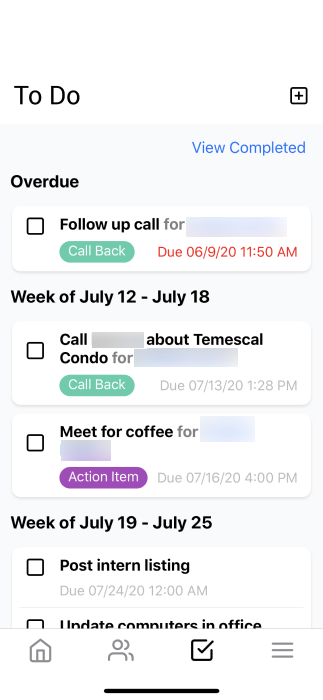
The To Do List feature of the Agent CRM can be used to create tasks and to-do items related to your leads and your business.
Tasks can be marked as completed by checking the checkbox next to the task. Completed tasks then disappear from the default page, but can be displayed again by tapping the “View Completed” link in the upper-right.
A specific lead can be associated with a task, either by adding the lead to the task from the To Do page, or adding the task from the lead record page. A link to their lead record page then appears on the task block.

NOTE: When a task is overdue, the due date on the task block will turn red and the task will appear at the top of the to do list.
Creating a New Task
- Tap the To Do icon at the bottom of your screen.
- Tap the plus icon in the upper-right. The “New Task” screen will appear.
- At minimum, you must give the task a “Title” and a “Due Date” before you can create the task.
- Title – the title of the task as it appears in the task list
- Description – the text description of the task to provide more details
- Task Type – selecting a task type adds a label to the task to help sort tasks based on their type (i.e. Appointment, Phone Call, etc.)
- Associate Lead – you can select an existing lead to associate with a task. The task will then appear on the lead’s record page
- Start Date – The start date defaults the date it is when the task is created, but can be changed
- Start Time – The start time of the task defaults to the time you create the task
- End Date – required field to select the date the task is due
- End Time – the time the task is due
- Priority Flag – clicking on the flag icon turns the priority on (red) or back off (black)
- To finish creating the task, tap the checkmark icon in the upper-right when all fields are filled in. You will be returned to the To Do list and your task will appear in the task list.
Viewing/Editing a Task
- To edit a task, locate it in the task list and click on the title or description of the task.
- The Edit Task screen will pop up, and you can make any changes to any of the fields in the screen.
- Tap the checkmark icon in the upper-right to save your changes.
- If you are just viewing the task, you can tap the X icon in the upper-left and no changes will be made.
Viewing Completed Tasks
- Tap the To Do icon at the bottom of your screen.
- Tap “View Completed” link in the upper-right.
- You will now see all completed tasks.
- Tap “View Active” link to return to the active tasks that are not yet completed.
NOTE: If you want to re-open a task that was marked closed, tap “View Completed” and tap the checkbox next to the task you want to reopen. The task will now return to the default “Active” task list.